
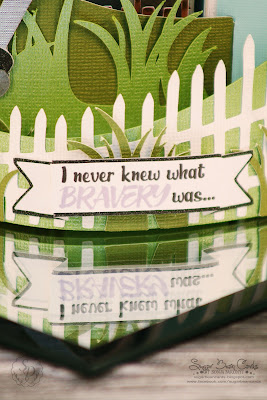
I never knew what bravery was...
We all are affected by cancer in one shape or form. Whether it is a family member, a friend, a friend of a friend, or a personal journey. I was honored when a good friend of mine requested a castle card for one of her friends.
After finding out a bit about what he is facing, I immediately thought one of Lori Whitlock's 'Center Box Card' from the Silhouette Design Store was perfect for this project. However, I couldn't find a castle one. So I set out to design my own.

I decided Scrappy Dew's 'Knights' file for the castle and knight was a perfect fit. I wanted to have the castle be 3D in a sense, so that means I had to slice and dice the file.
 I used my Sizzix Big Shot to emboss clouds in the sky, dots on the white clouds, and bricks on the castle.
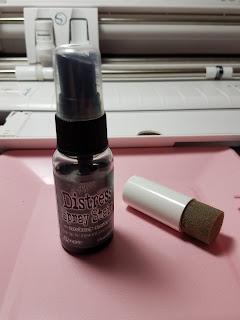
Once I embossed the bricks onto the gray portion of the castle, I decided to bring in some Tim Holtz distress ink.
I am fairly knew the Tim Holtz spray ink. I use his distressed ink pads and decided to give the spray inks a try. However, I wanted the bricks to have definition, but only a slight difference. Instead of spraying the paper, I dry brushed the ink on.


Untuck tab one for a full view of the knight. For the shield, I added a ribbon in the color that represents the type of cancer that the recipient is fighting.

Untuck tab two and you have a full view of the castle
 The inside panel has an area for a message to be written.
 I love the different lights/colors that the rose gold takes on in different lighting.
 The card folds completely flat to be shipped or hand delivered in an A7 envelope.

Step One: Open file in Silhouette Studios Designer Edition
 Step Two: Open the Knife tool
The knife tool is located on the left hand side tool bar, under the eraser
 Step Three: Slice it and dice it
***Sugar Tip*** when I work with the slice tool, I click the checkbox next to auto apply to click that off. I do this so I can move or make multiple copies of the line so I can cut more than one thing at once as well as make sure it is lined up to where I want it before slicing.
 Step Four: Line it up and select the arrow button. Select the red line and click apply selected knife.


 As well as the center of the castle
 Optional step: I made a duplicate of the ends and stretched them higher to make another element to the castle
 After slicing and dicing, this is what I am left with for my castle base
 Step Six: Build the box base
The bottom of the castle works a whole lot like a card in the box.
 Select the pieces of the castle you want to be the box portion of the card (in this case I did the main portion of the castle and two towers), I welded boxes to the bottom.

 Step Seven: Build the base background
Now I am ready to build my base shape of the card using the rectangle icon. While I was at it, I decided to make the grass and fence of the card a bendy card.
The base measurements are 7in. x 7.250in.

Materials Used:
DCWV 'Gray Kraft & Rose Gold' and 'Rose Quartz' stacks


After finding out a bit about what he is facing, I immediately thought one of Lori Whitlock's 'Center Box Card' from the Silhouette Design Store was perfect for this project. However, I couldn't find a castle one. So I set out to design my own.

I decided Scrappy Dew's 'Knights' file for the castle and knight was a perfect fit. I wanted to have the castle be 3D in a sense, so that means I had to slice and dice the file.
DCWV's 'Gray Kraft & Rose Gold' stack as well as the 'Rose Quarts' stack was perfect for the castle and knight.

Once I embossed the bricks onto the gray portion of the castle, I decided to bring in some Tim Holtz distress ink.
I am fairly knew the Tim Holtz spray ink. I use his distressed ink pads and decided to give the spray inks a try. However, I wanted the bricks to have definition, but only a slight difference. Instead of spraying the paper, I dry brushed the ink on.


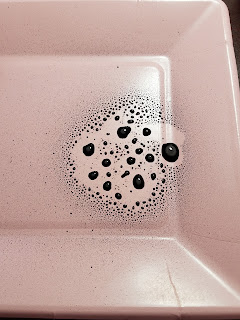
Spray a bit on a paper plate, grab anything you can use to drybrush, dab the extra ink off on a napkin and run it over the embossed area lightly.


The sentiment is perfect for a card of this nature.

Untuck tab one for a full view of the knight. For the shield, I added a ribbon in the color that represents the type of cancer that the recipient is fighting.


Steps to Slice and Dice a file
Step One: Open file in Silhouette Studios Designer Edition

The knife tool is located on the left hand side tool bar, under the eraser

***Sugar Tip*** when I work with the slice tool, I click the checkbox next to auto apply to click that off. I do this so I can move or make multiple copies of the line so I can cut more than one thing at once as well as make sure it is lined up to where I want it before slicing.


Time saving step: Below I did two lines with the auto apply unselected.

Step Five: Click on both red lines and select 'apply selected knife' to get two ends of the castle


The bottom of the castle works a whole lot like a card in the box.


Now I am ready to build my base shape of the card using the rectangle icon. While I was at it, I decided to make the grass and fence of the card a bendy card.
The base measurements are 7in. x 7.250in.

Materials Used:
DCWV 'Gray Kraft & Rose Gold' and 'Rose Quartz' stacks


Scrappy Dew 'Knights' file
Silhouette Cameo 3
Silhouette Studio Designers Edition
Tim Holtz Distress Spray-Hickory Smoke
Sizzix Big Shot
Darice-clouds, polka dots, and brick embossing sleeves
Aleene's Original tacky glue
Scotch Advanced ATG gun


What a wonderful and oh so meaningful card! Your time and effort that you put into it shows! The recipient will definitely be touched with this card.
ReplyDeleteThank you Beth. I am sure he will!
DeleteOh my golly gracious! Sonja this card is beautiful. The colors you chose and the effort you put into this creation can be felt in the card. So happy to have you on the team. Jana DT/SD
ReplyDeleteThank you so much Jana! :)
Delete