
Digital Stamping with no printer ink...
Hello Beans. Today I am going to give you a photo tutorial of using the digital stamp files (DS). KaDoodle Bug has released a ton of new DS (link at bottom of post).
Now, if you are in the same boat as me, no ink in the printer no need to worry. There's always a solution to a problem!
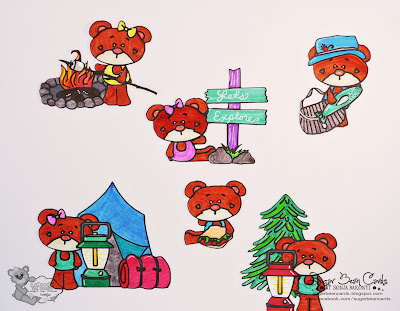
At first I was not going to participate in this release as my printer is down for the count and most of my Spectrum Noir markers are dried up! But after thinking about it for a day, I bit the bullet and picked out a great brand new DS file, Camping Sweet Bear.


Now, if you are in the same boat as me, no ink in the printer no need to worry. There's always a solution to a problem!
At first I was not going to participate in this release as my printer is down for the count and most of my Spectrum Noir markers are dried up! But after thinking about it for a day, I bit the bullet and picked out a great brand new DS file, Camping Sweet Bear.
To start with, open your file. (I am working with Silhouette Studio's Designer Edition)
Step 1: Find your file in either your library

or where you saved it on your computer.

Step 2: Open it. I like to keep all images of one file on one page so I don't have too many files to save to my library. Save your image to your library if you want easy access to it.


Step 3: Open your tracing tool (If you are using a png file with the print and cut option but you want a smooth cut instead of a square you can still follow these directions, just skip the tracing of the inner image. If you have more questions on this just ask and I can help further!) The tracing tool is highlighted in blue.

Select trace area button and drag arrow over the image you would like to trace.


Step 4: Next, select one of the three options: Trace, Trace Outer Edge, or Trace and Detach
For the first step of tracing, I selected the trace button. All the lines looked good to me so there was no need to mess around with the controls on this particular trace.

Once the Trace button is selected, it will trace the lines and leave you with a red outlined image. *********Repeat step 4, but select Trace Outer Edge this time over the original photo********* By doing this, you are able to use the Silhouette Pen Tool option to trace all the important lines, while using the cut outer edge feature to cut the outside of your image.

Repeat the process for all images you wish to use
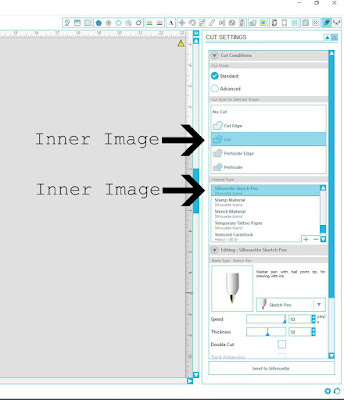
Step 5: Select the inner image of what you want to use the Silhouette pen function for.

I will show you what I mean by inner image below.

The pink highlighted area is the inner image that you will want to use the pen feature on. The red highlight area is the outer image that will be cut AROUND the inner image. I simply pulled them apart to show the difference, but keep them aligned so that your image cuts well.
Step 6: After you have selected the inner image, go to the cut tool. Select cut, Silhouette Sketch Pen under Material Type, make any adjustments, take the blade out and place your pen or Silhouette pen holder, then send to Silhouette.


Small tip, if you are cutting/drawing a large amount, the mat tends to bounce around. Just place something of the same level under the mat. I actually find it useful to use my glue container as it rolls with the mat if I need it to.

Step 7: Unselect the inner image and select the outer layer ONLY, go to the cut tool. Select cut or outer edge. Go to Material Type and find your type of paper, make adjustments. Replace the blade and send to Silhouette.


Step 8: Color and enjoy!! (I used a combination of crayola markers, spectrum noir, and sharpie markers).


We are doing an all day Color With Us Saturday! Now we will have postings from our DT of their coloring projects but we can't do this without you! And of Course we have prizes!
First way for prizes, make sure you comment on all the posts on our fan page, (https://www.facebook.com/kadoodlebugdesigns/) we will draw a winner from EACH post for a FREE DS file of your choice.
Second go get yourself DS files (http://kadoodlebugdesigns.com/shop/index.php?main_page=index&cPath=63) and color your own! Enter it on any of our pages and you will be entered to win more files! So who's excited?! I know I am! Let's Go!
Further questions, just ask!


Comments
Post a Comment
Thank you for visiting Sugar Bean Cards!
FTC disclaimer: I received some of these products for free but was not compensated for writing this post.